Plasticine modeling is fun. It also helps children develop fine motor skills in their hands, which in turn affects the functioning of the speech apparatus and the development of speech.
DIY plasticine crafts: features
The fact that from development of fine motor skills of the hands depends on the child’s speech, has long been proven. Therefore, it depends on you whether the child learns to speak correctly. Develop finger skills, stock up with colorful plasticine and invite your baby to participate. You need to start playing games with plasticine with a child from the age of 2 years old or from the time that he has definitely stopped pulling foreign objects into his mouth.
It will be interesting for the baby to sculpt if you also take part in the process. The question arises, what crafts from plasticine can be fashioned with your own hands. It will be interesting for a small child to make those objects that surround him in ordinary life, namely: a car, animals, the characters of his favorite cartoons. You can offer to make a dinosaur or a kangaroo to a child who already has an approximate idea of these creatures.
DIY plasticine crafts: materials and methods
To start sculpting, you will need colored plasticine, a plastic knife for cutting plasticine, an orange stick (manicure) and a table on which you will do crafts. It will be convenient for an orange stick to make indentations in plasticine, because it has sharp and flat edges.
Well, if you have not one set of plasticine, but a whole palette of various colors. The child needs time for imagination. Support him, praise, prompt, but in no case do not press on him, do not scold and do not criticize. Modeling should be fun.
Plasticine cartoon characters

Favorite fairy-tale characters delight children. They associate themselves with characters, they want to imitate them. For this reason, it will be especially interesting for the child to participate in the sculpting process with you.
Select the character you want to make. Choose for him a suitable shade of plasticine and start creating. To make a character from the cartoon Smeshariki, you need a plasticine ball, a pair of legs and arms, ears, a nose or a beak, eyes and a hairstyle.
Let your child help you. Ask him to make legs and handles for the hero while you are working with the body.
Fashion all the necessary pieces and stick them to the body, thus collecting the entire figure of the character. Using the tool, draw a mouth, nostrils and hooves or hands.
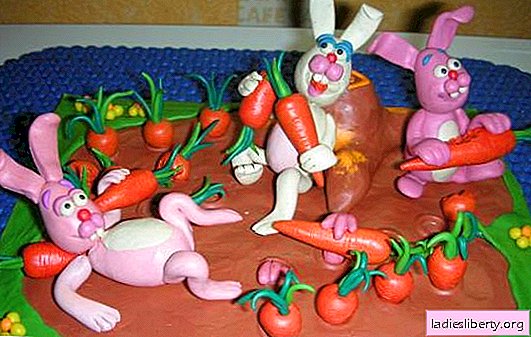
Plasticine village yard

When a child already knows what pets look like, he will be interested in trying to recreate familiar characters from plasticine.
Try to make a cow. For her, it will be necessary to mold the following details: head, eyes, body, four legs, tail, ears, horns and spots to simulate the color. The head and body are in the shape of an oval. Gather all the parts together, draw a nose and stick the spots on the body, slightly smearing or stretching them. You have a thoroughbred spotted cow.

Make plasticine from a plasticine yard, such as chicken or duck. To do this, you will need to make the body of the bird, tail, wings, legs, crest, beak and eyes. For the body, roll plasticine into a ball and give it an egg shape. The narrow part will become the head, and the wide belly. Blind all the prepared parts in their places. With a stick of orange, make indentations in the beak or draw a mouth.
To make a horse, prepare the details in the form of a head, neck, torso, legs, ears, eyes, mane and tail. The body and head in the form of an oval, neck and legs - the figure of a cylinder. Combine all the details with the body and the sharp end of an orange stick, draw a nose and hooves. You can also draw curls in the tail, drawing the sharp end of the stick along the tail. Blend the joints between the parts with your finger so that the seam is not visible.
A village courtyard cannot be without sheds, stables, creches, and other feeders. Make simple houses in the form of walls, roofs and gates. If you want something special, you can build a more complex structure. If the house made of plasticine is expected to be high, then, so that the crossbars do not sag, you can add wooden sticks or toothpicks to the structure. To do this, measure the length of the vertical beam, roll it with a sausage and hide the stick of the same length inside plasticine. It should run along and should not be visible.
Make four such columns and set them at the corners of the building. Now make the walls, for them, roll the plasticine in the form of a sheet and lean it against the pillars. There should be three such walls. The fourth wall will be the entrance to the barn, so in that place you can make a gate.
Use wooden sticks to prevent the roof from sagging, laying them on the walls in rows across the building. Lay a sheet of plasticine on them so that the sticks are not visible.
3D plasticine picture

It will also be interesting to create a three-dimensional picture of plasticine. Come up with the event that you want to highlight and related characters.
You will need to work: the basis for the picture, colored plasticine and a pencil. The basis should be a dense, solid surface, such as a piece of wood or cardboard, cut to size.
Draw based on the outline of the image that you want to transfer to the picture. Next, select a background color and smear it on the canvas with your fingers in a thin layer in order to paint over the surface. When applying the background, go beyond the outline by 1 cm, as if placing plasticine under the image that appears in the place where the outline is now. This is done for reliability, so that random gaps do not appear and cardboard does not appear through the cracks.

Now you have a choice of how the images in the picture will look. They can be slightly voluminous and protrude above the surface or be absolutely flat flush with the surface.
If you want to see the picture flat, then apply the plasticine, smearing it in predetermined places in the following sequence: first the background, then the figure of the character, then the small details: eyes, beak, pocket on the clothes, button and so on.
If you want to make the figures of characters protruding volumetric, then you do not need to smear them on the surface. Make the desired hero in your hands, and then stick to the picture and gently press it, you get a flattened figure. Do the same manipulations with the rest of the character. Proceed in the same sequence: first the background, then the character, then the small details. This is how it looks.

DIY plasticine crafts: professional tips
• When choosing a color, do not require the child to use only the color appropriate for the animal. Do not limit the imagination of the child. A pink horse will delight him no less than gray.
• If the clay is too hard, knead or warm it in your hand. Do not place it on a hot battery, otherwise it may leak, staining the battery and the floor.
• Try to work with plasticine only on a prepared surface. If the clay falls and rumbles into the carpet, then you can get it out, but you have to work hard.